Contact Us at 760-480-2323

printing

How to Add Bleeds For Printing

Bleeds are important to add to your print files to ensure that artwork extends to the edge of the printed piece.  Printers cannot print to the edge of a piece of paper so bleeds are created so that printing is done on a large sheet which is then cut so that the artwork extends to the edge of the piece.

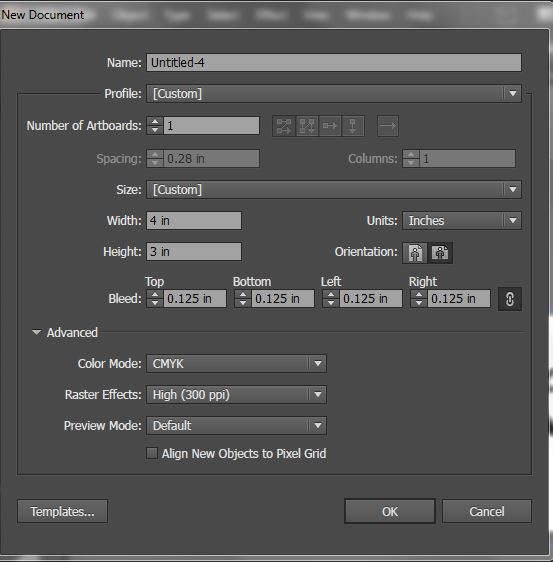
To setup your artwork with bleeds you will need to add the bleeds to the document when creating the document.  Typically it is best to add a 0.125" bleed to all sides.  This can be done in the new document screen as seen below.

Bleeds.JPG

It is important that you do not include any artwork that you do not want cut of in the bleed area.  It is also recommended that you leave a 0.125" buffer from the edge of the piece to the further ensure that no important text or images get trimmed.  You will see a white space which indicates the finished size of the piece and then a red line which shows the edge of the bleed.  All artwork that is not to be trimmed should be included in the white space.

Bleed lines.JPG


Once you have created your design you will then need to save the file to a PDF bleeds.  On the save menu select Marks and Bleeds.  It is helpful to select Trim Marks (though we can add them after).  You will also need to ensure that the bleeds are exported.  If you have setup bleeds in the document it is best to select Use Document Bleed Settings.  If you have not then you can add the bleeds here, just make sure that your artwork extends past the edge of the finished size.

bleedsave.JPG

Including bleeds in the creation of your artwork will help ensure that printing is setup correctly and that your artwork will not need to be manipulated to ensure that bleeds are included.  Bleeds are essential if you want your artwork to extend all the way to the edge of the piece.
Printing Personalized Color Letters at Lower Costs

Printing personalized letters is often times more expensive than printing static print as the printing process can be different.  The difference in cost will depend mostly on the quantity as for larger quantities it is much more cost effective to offset print static images.  Yet, there are a few ways you can print personalized color letters at lower costs.

In order to reduce the price many times it is preferable to print static shells then over print the variable information onto the shells.  This can drastically save money especially if the shells are printed in color but the variable personalized information is in black and white. 

Typically Action Mail will overprint variable data with a digital laser printer but it is even cheaper to print the variable data on our inkjet printers.  The inkjet printers have a limited 4 inch space which they can print on and the print quality is not as good as a laser printer, but this can significantly reduce costs and for some pieces it will be difficult to tell which printer the personalization is printed on.

How to setup your print files

It is very important to design and send your print files correctly to ensure high quality printing.  

Below are a few guidelines for setting up your print files correctly

Bleed:  Include a 1/8" bleed around the printed area.  In other words extend the design of the piece by 1/8" knowing that we will trim that extra 1/8" off the piece to ensure that the design extends to the edge of the printed piece.  This means that for a 8.5x5.5 postcard will have final dimensions of 8.75x5.75 as there will be a 1/8" bleed on each side. It is helpful to add cutmarks as well.  

Safe zone: Do not include any copy or critical images within 1/8" of the edge of the piece.  This ensures that when the piece is cut to size no important text or images are cut in the process

Colors: All files should be designed with CMYK colors not RGB

File format:  We prefer high resolution PDFs to ensure great print qualities.  You can also provide native files and have us export the file to a print ready format.

If you need any help or would like us to assist you in preparing your files please contact one of our customer service representatives.


Should I print my postcard Glossy or Matte?

It most depends on personal preference but there are a few pros and cons associated with printing glassy or matter postcards.

Glossy

Glossy postcards have a smooth and shiny finish and look very polished.  This coating allows for a crisper looking image, especially when the card is filled with vivid imagery.  Glossy cards are great for postcards that have lots of colorful images.  Glossy postcards will also be processed through the United States Postal Services’ machines with less damage.

Matte

Matte cards have a subtle shine and offer a more professional look.  Matte postcards are more commonly used in cards that are predominately text based or where text is the focus of the card.  The matte finish allows high contrast between text and images and increases the readability of the card.  This finish also enhances white space within the card.

Ultimately the choice is yours and you cannot really go wrong with either, yet the subtle differences between a matte and gloss could give your postcard the perfect look and feel that will grab the recipients attention.